Ahoy!

Its been quite some time since I set out to complete part two of my home lab write up. Naturally, a lot has changed!!

Physical changes

In part one I discussed by physical layer, this is changed slightly with the addition of my FTTH connection and deprecation of the old crappy FritzBox and related ADSL hardware.

Along with the FTTH connection I switched to using a Juniper SRX210 for CPE after having issues with the Ubiquiti ERL’s and DHCPv6-PD. These days I am up and running with native dual stack thanks to Internode.

I also persisted for a while to use the Rocket M2’s for the PPPoE backhaul before giving in and running cable to make the most of my 100/40 connection. The 2.4Ghz link could only manage ~110Mbps simplex and I configured QOS to ensure only 35Mbps was used in upload. In practice while the radio link was fast enough I was too purist to keep it.

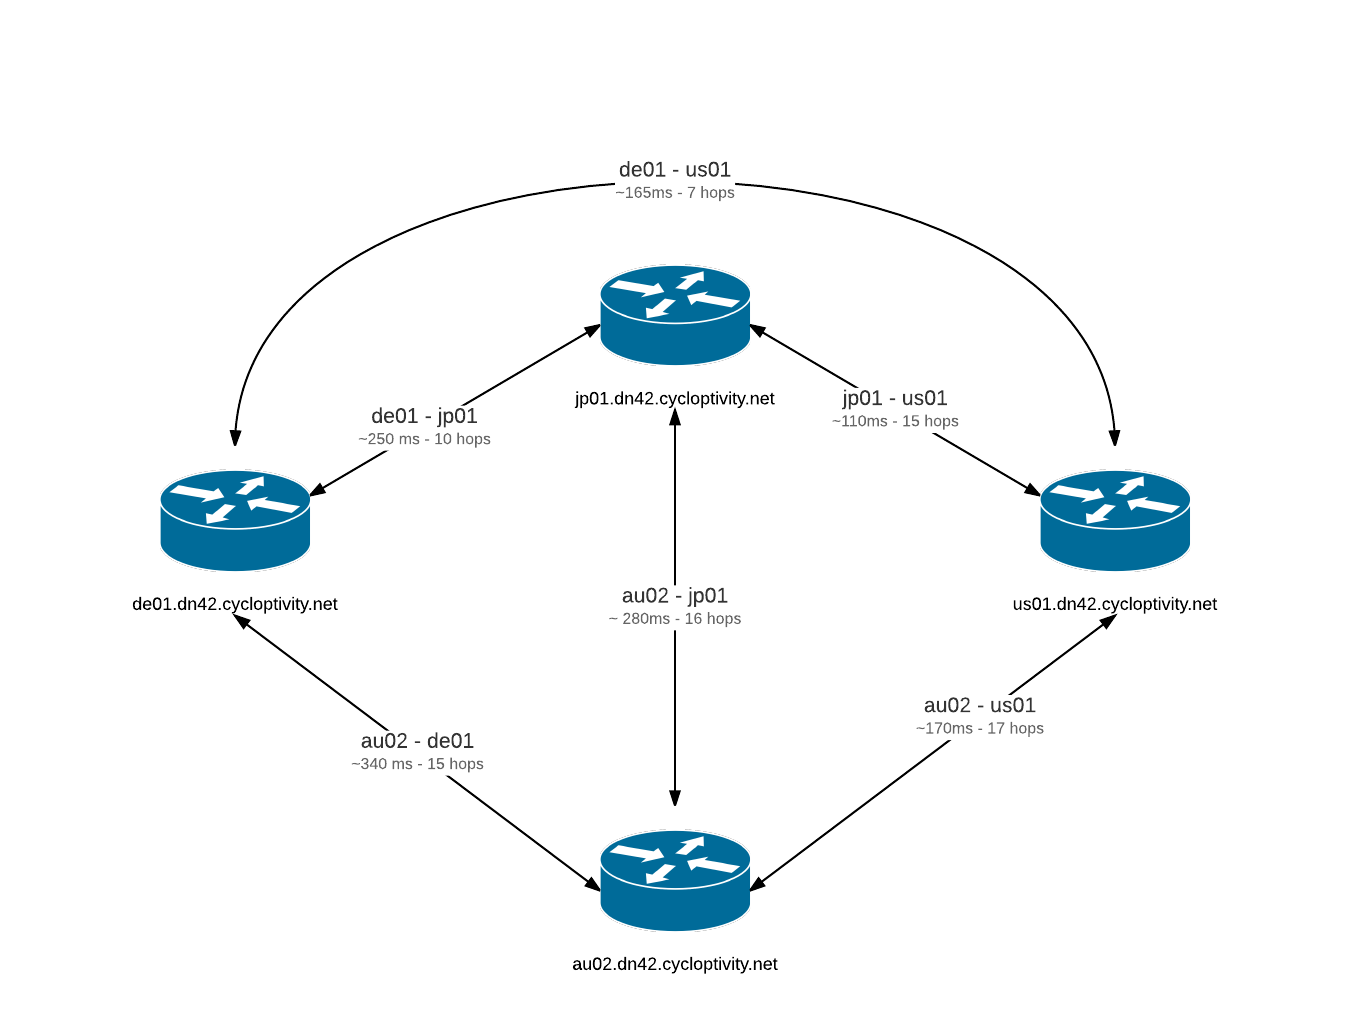
Here is how it looks earlier this year;

You will see the most exciting addition for me was to lash out and replace the Dovado GO with an Opengear ACM5504-5-LR-I. A huge thanks for the guys at Opengear for all the work they have put into their eco-system and their products. When I deploy one of these boxes it does everything I can possibly ask of it. Want to use PCRE to parse incomming SMS? They have done that. Triggers on environmental alarms? Done that. Automatically multi-homed failover? Tick. SSH to a serial port shell? Yup! Great work guys, please keep it up! (Plus we all know what kind of franken raspi + 4x USB serial adaptors would have been like). If anyone is interested in a more detailed write up on how I am using the ACM5504 please feel free to comment with your questions.

The Network

As promised I have some old diagrams which captured the layer 1 and a hybrid layer 2 / layer 3 diagram. At the moment I have not done a complete layer 3 only routing diagram since I am busily changing things with my DN42 infrastructure. You will get a pretty good idea of my internal OSPF network as well as the different segments and routes anyway.

Layer 1

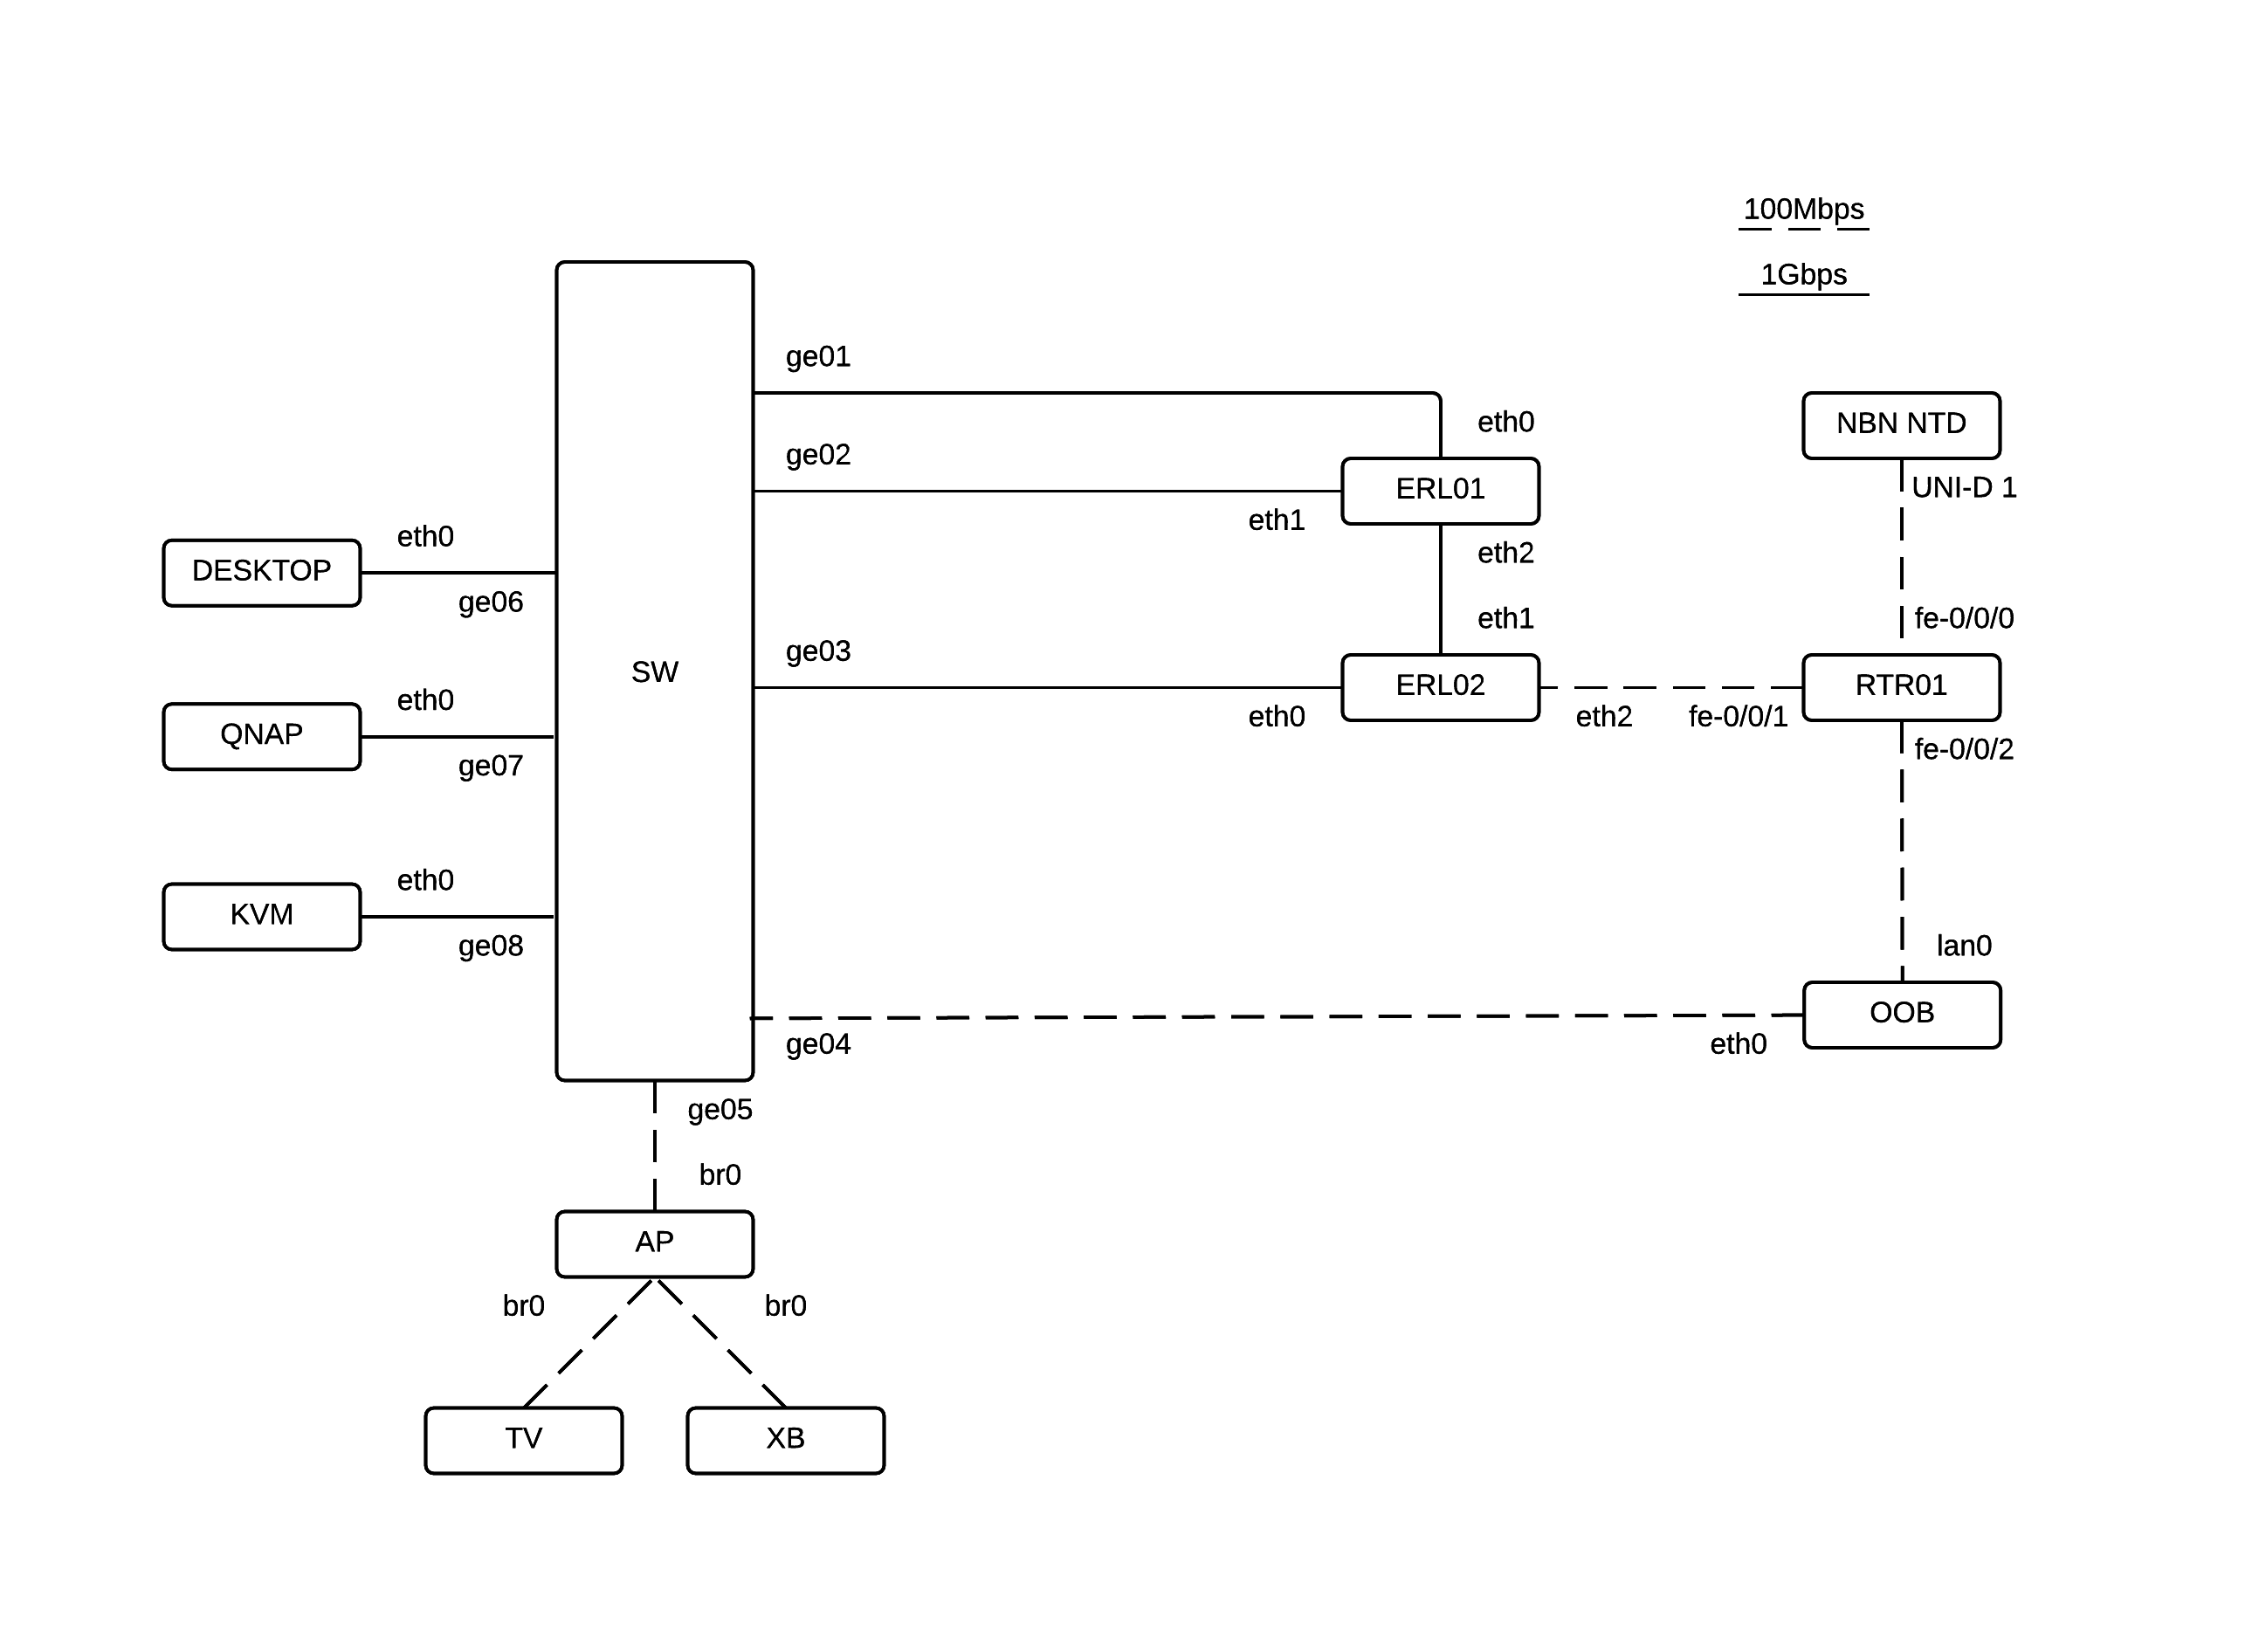
Nothing unexpected here, astute readers will note I stopped using LACP LAG’s and moved back to single gigabit links. The reasoning behind this change was that the Ubiquiti ERL’s cannot use hardware offloading on GNU\Linux bonded interfaces. So in reality your able to get better VLAN routing and throughput on a single link than a bonded one. That being said if you want redundancy at L1 then go ahead and take the hit.

Layer1

Layer 2 / 3

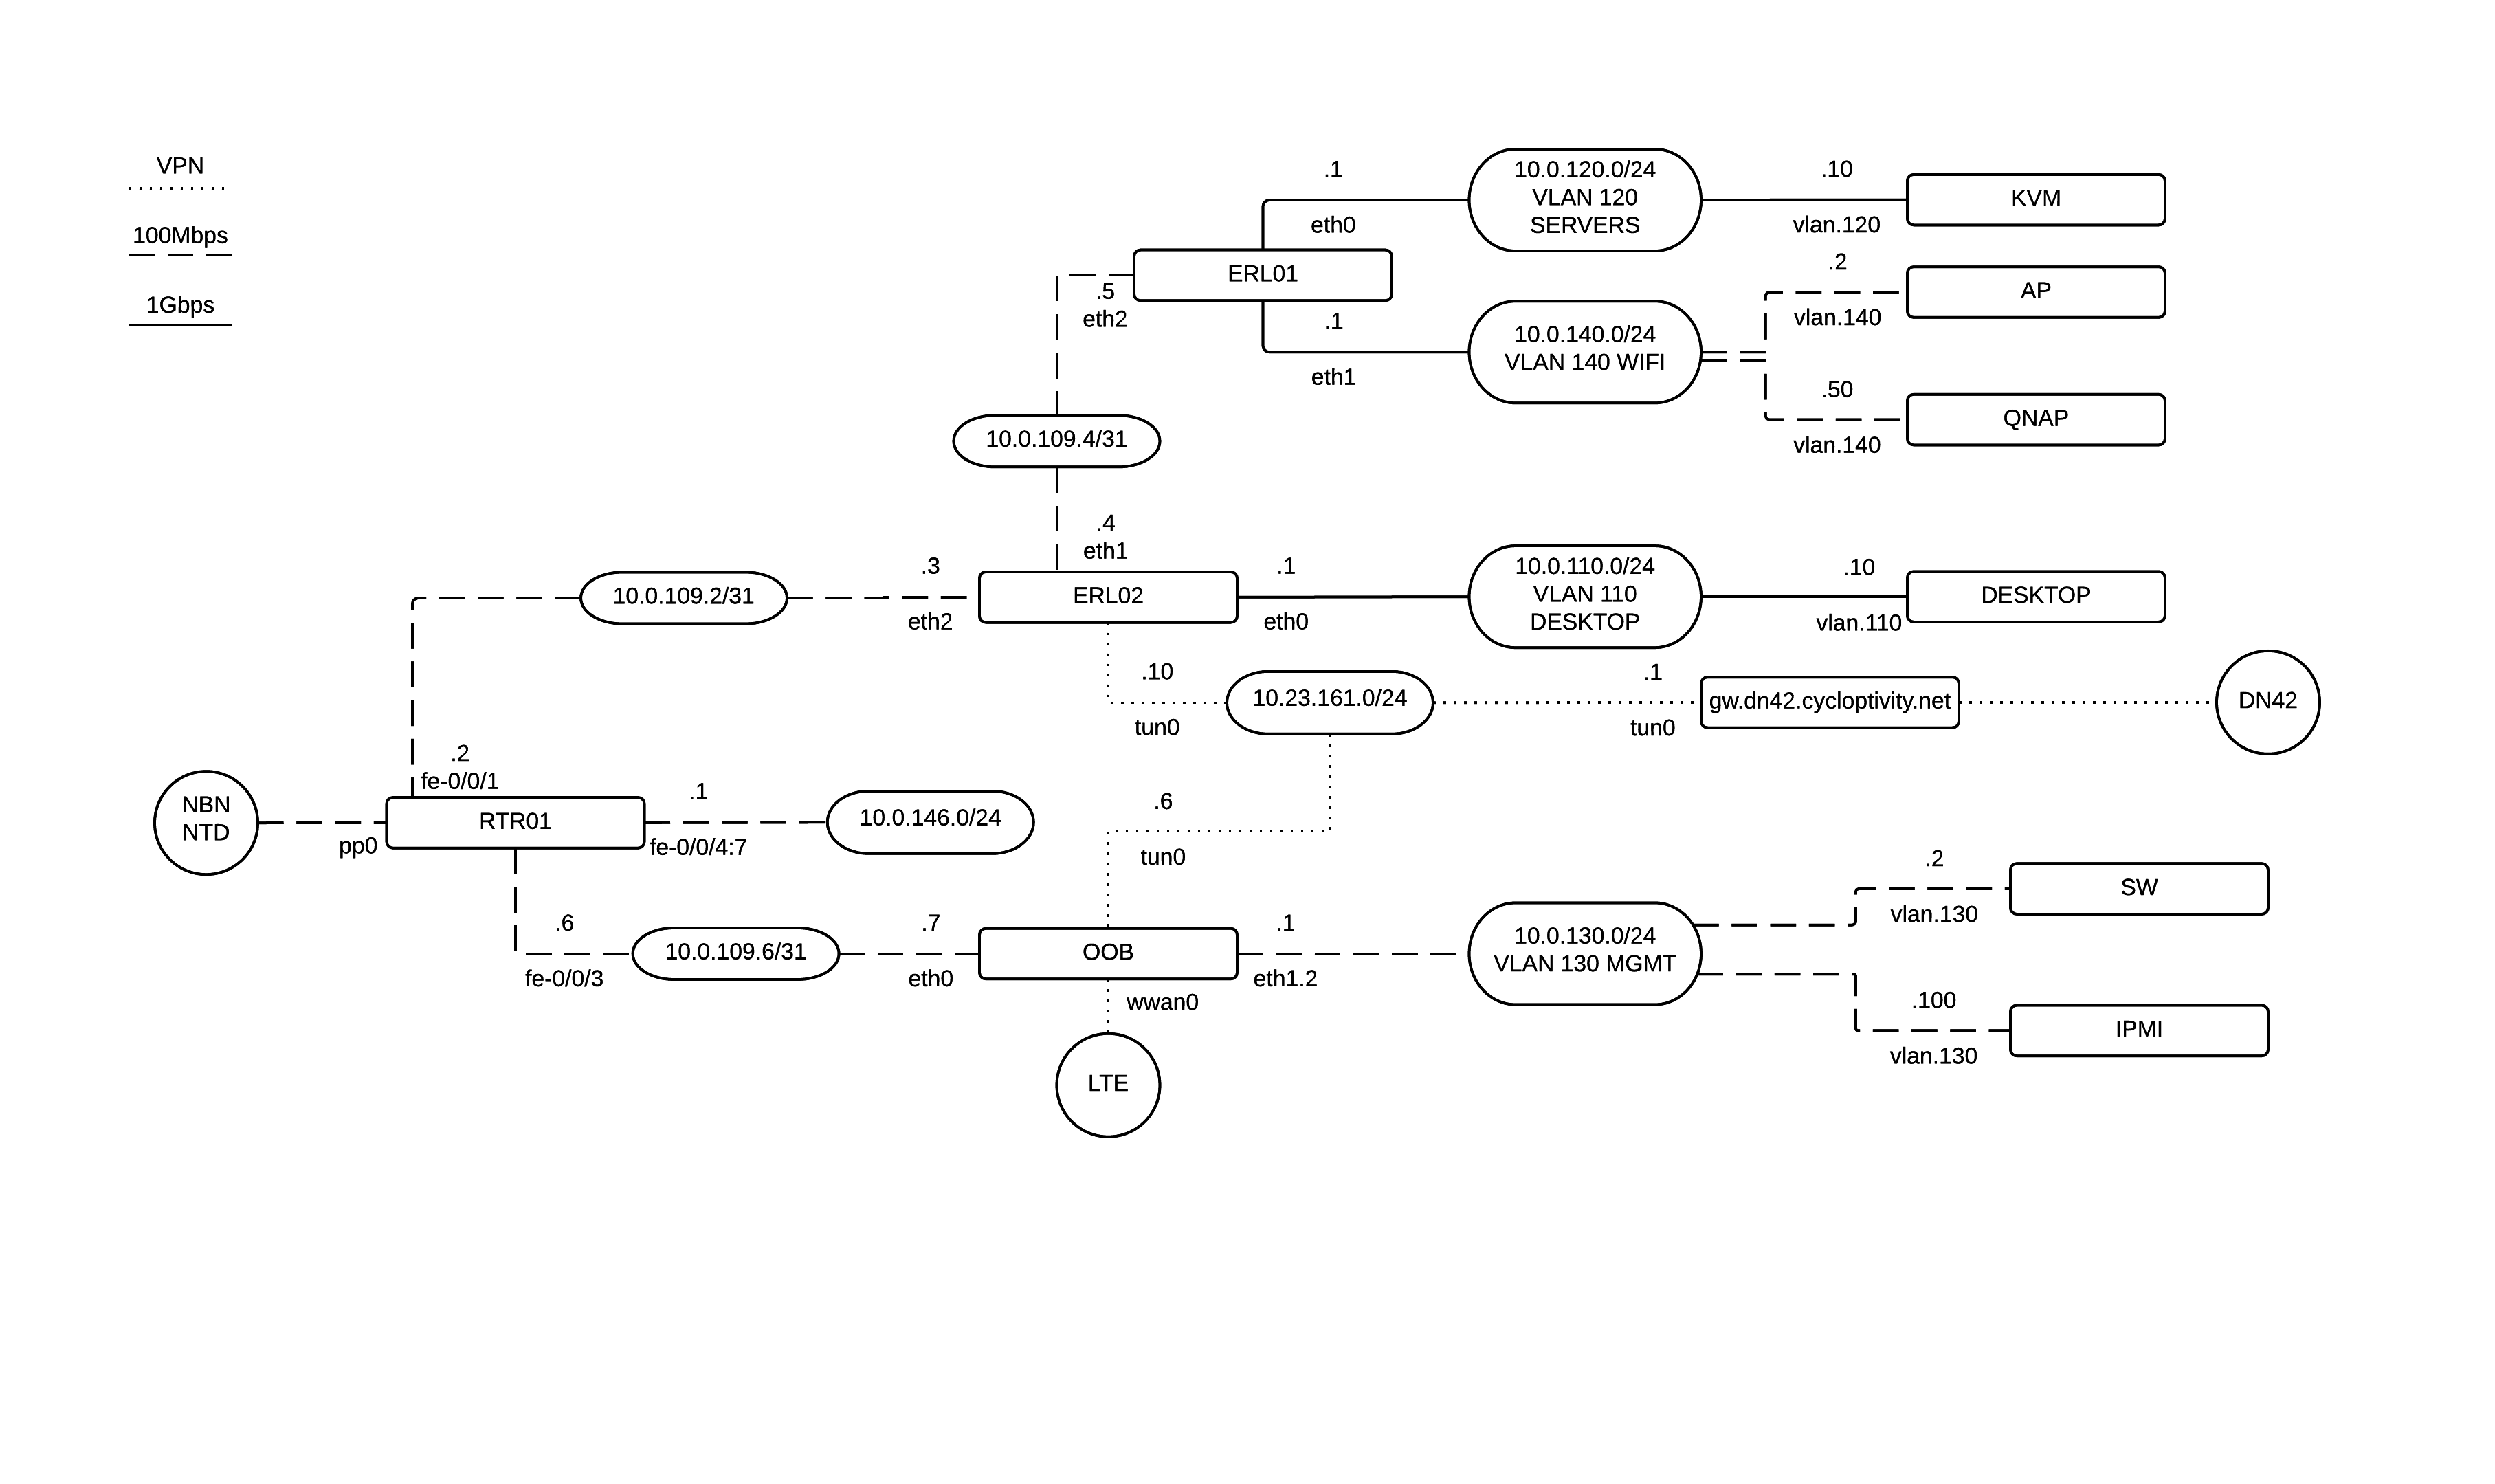
Here is the really fun part. To decipher the diagram I used a basic key;

  • Ovals are subnets
  • Recetangles are physical routers
  • Circles are destination networks

Layer 2/3

As you can see in this design its a fairly crude campus style L3 design. RTR01 acts the the core while there are two distinct physical networks. The Out Of Band (OOB) network and the campus network.

The campus network is actually the wrong way around and the diagram is incorrectly showing a 100Mbps link between the two ERL’s. The reason for this is simply because of the 3 port count on a ERL. To get 1Gbps to the servers from both guest / wifi and the desktop network it meant using 4 wired ports. Obviously that means a transit link needed to exist between the two. As it turns out this was a fun OSPF implementation anyway.

That is all I have time for now but I hope this can inspire you to pursue your own lab environment. If you have any questions please feel free to use the comments or hit me up online.

TLDR

I am updating my GPG keys

Process

I am cleaning up my GPG keys along the way as part of my DR plan. At the moment I have a mess of keys everywhere! Most legacy keys have expired, been revoked or ultimately lost through mismanagement. My aim is to arrive at a point where I can carry with me my identity for both SSH and GPG.

I am generating a day-to-day GPG key to use via my Yubikey NEO. I will also create a backup GPG smart card using a spare German Privacy Foundation Cryptostick v1.2. Finally, the master copy remains on a physically secured USB key(s).

What follows below is notes on recreating this whole thing from scratch again.

Trusted Live Environment

To generate new keys I first boot a ancient laptop using an isostick and a copy of the Fedora 21 Workstation image. After verifying the sha256sum I copied the ISO to the isostick and can boot via the virtual CD-ROM.

Once booted and presented with the installers grub menu, select Troubleshooting then Test this media & start Fedora Live. At this stage I also press tab and remove the quiet rhbg arguments so that I get feedback on the boot process.

At the gnome prompt click Try Fedora to continue into the live OS.

Extending the Live Environment

The first time you boot you will need to connect your environment to the Internet and grab some packages for offline use later.

sudo yum install yum-utils
yumdownloader --resolve ykpers-devel libyubikey-devel libusb-devel autoconf gnupg gnupg2-smime pcsc-lite pcsc-lite-libs
yumdownloader --resolve gnupg-agent libpth20 pinentry-curses libccid pcscd scdaemon libksba8

Full deps in the case of resolve not working, it seems that pre-installed packages are not pulled into the download directory leaving you with broken deps.

autoconf-2.69-16.fc21.noarch.rpm
elfutils-0.161-2.fc21.x86_64.rpm
elfutils-libelf-0.161-2.fc21.x86_64.rpm
elfutils-libs-0.161-2.fc21.x86_64.rpm
glibc-2.20-7.fc21.x86_64.rpm
glibc-common-2.20-7.fc21.x86_64.rpm
gnupg-1.4.18-4.fc21.x86_64.rpm
gnupg2-smime-2.0.25-2.fc21.x86_64.rpm
libgudev1-216-17.fc21.x86_64.rpm
libusb-devel-0.1.5-5.fc21.x86_64.rpm
libusbx-devel-1.0.19-2.fc21.x86_64.rpm
libyubikey-1.11-3.fc21.x86_64.rpm
libyubikey-devel-1.11-3.fc21.x86_64.rpm
m4-1.4.17-6.fc21.x86_64.rpm
nss-softokn-freebl-3.17.4-1.fc21.x86_64.rpm
pcre-8.35-8.fc21.x86_64.rpm
pcsc-lite-1.8.13-1.fc21.x86_64.rpm
pcsc-lite-ccid-1.4.18-1.fc21.x86_64.rpm
pcsc-lite-libs-1.8.13-1.fc21.x86_64.rpm
systemd-216-17.fc21.x86_64.rpm
systemd-compat-libs-216-17.fc21.x86_64.rpm
systemd-libs-216-17.fc21.x86_64.rpm
systemd-python-216-17.fc21.x86_64.rpm
systemd-python3-216-17.fc21.x86_64.rpm
ykpers-1.16.1-1.fc21.x86_64.rpm
ykpers-devel-1.16.1-1.fc21.x86_64.rpm

After yum has downloaded the packages to your working directory copy them to media you can attach to your offline machine.

Reboot to start a clean instance and mount your storage containing the downloaded packages.

yum localinstall *

Now we can get started generating keys!

RAID

While some people might trust their cold storage, since I am using what are actually very crappy USB keys I thought I might RAID then just in case one decides to flip a bit on me.

Creating the array

First lets test both disks are actually OK

dd if=/dev/zero of=/dev/disk/by-id/YOUR-DISK

Create the RAID partitions

fdisk /dev/disk/by-id/YOUR-DISK
n
p
1
enter
enter
t
fd
w

Create the array

mdadm --create md0 -n 2 -l 1 /dev/sdc1 /dev/sdd1

Lets format it!

mkfs.ext4 /dev/md0
mkdir /tmp/raid
mount /dev/md0 /tmp/raid

Further use

Once we are done we will stop the array to unplug the USB keys

umount /dev/md0
mdadm -S md0

To re-use this array next time we scan for existing RAID with both disks plugged in

mdadm --assemble -s

Generate the master key

After opening your terminal window, you need to update the environment variables for gnupg.

export GNUPGHOME=/tmp/raid/gnupg
mkdir $GNUPGHOME

Note: You cannot mount this on a vfat volume as gpg-agent will not be able to open a unix socket.

Now we update our config

cat > $GNUPGHOME/gpg.conf
personal-cipher-preferences AES256 AES192 AES
personal-digest-preferences SHA512 SHA384 SHA256 SHA224
cert-digest-algo SHA512
default-preference-list SHA512 SHA384 SHA256 SHA224 AES256 AES192 AES ZLIB BZIP2 ZIP Uncompressed
use-agent

Note: You can’t opt out of 3DES and SHA with this configuration. gnupg will automatically add them to the trailing end of your preferences.

After the configuration is done we generate the master key to be used only for signing operations.

    gpg2 --gen-key
    Your Selection? 4
    4096
    2y
    y
    Sam Wilson
    [email protected]
    O

Now we can add our extra UID’s

    gpg2 --edit-key <YOUR KEY ID>
    adduid
    Sam Wilson
    [email protected]
    O
    uid 1
    primary
    save

Generate a revocation certificate

    gpg2 --output $GNUPGHOME/../revocation-certificate.txt --gen-revoke <YOUR KEY ID>
    1
    Created during key creation, emergency use only.

Backup the private keys to ascii

gpg2 -a --export-secret-keys <YOUR KEY ID> > $GNUPGHOME/../masterkey.txt

Generate sub keys

First we generate separate 2048 bit RSA keys for signing, authentication and encryption.

    gpg2 --expert --edit-key <YOUR KEY ID>
    addkey
    4
    2048
    2y
    y
    y
    addkey
    6
    2048
    2y
    y
    y
    addkey
    8
    s
    e
    a
    q
    2048
    2y
    y
    y
    save

Lets backup our sub keys.

gpg2 -a --export-secret-keys <YOUR KEY ID> > $GNUPGHOME/../mastersubkeys.txt
gpg2 -a --export-secret-subkeys <YOUR KEY ID> > $GNUPGHOME/../subkeys.txt

Also backup the $GNUPGHOME binary content in case we need to roll back GPG during later steps.

You can print to hard copy the text files we are created now.

Configure Yuibkey NEO

I found starting up gpg2 --card-edit as liveuser failed to open the smartcard. Running as root resolves the issue.

Lets configure the Yubikey NEO!

    gpg2 --card-edit
    admin
    passwd
    3
    12345678 # Default admin passwd
    <NEWPIN>
    <NEWPIN>
    1
    123456 # Default user passwd
    <NEWPIN>
    <NEWPIN>
    q
    name
    Wilson
    Sam
    lang
    en
    url
    https://www.cycloptivity.net/KEYID.txt
    sex
    m
    quit

Note: If your looking for a random pin generator try < /dev/urandom tr -cd 0-9 | head -c 6.

Now we start to move our sub keys to hardware. This is a one way operation and will leave the backups we took earlier as the only copy of your sub keys (except for the smart card of course!).

    gpg2 --edit-key <YOUR KEY ID>
    toggle
    key 1
    keytocard
    1
    key 1
    key 2
    keytocard
    2
    key 2
    key 3
    keytocard
    3
    save

Note: At this point, I actually hit this bug, after raising a case with Yubico to get a new unit I got started again.

Public key

You need to generate a copy of your master public key to share with the world. Lets make that available quickly.

gpg2 --export -a <KEY ID> >> $GNUPGHOME/../pub.asc

Take a copy of the pub.asc file to your daily laptop along with your Yuibkey.

Setup day to day laptop

Desktop Environments

While technically I should have been able to configure XFCE on my laptop to disable ssh-agent I found this had no effect on Fedora 21.

xfconf-query -c xfce4-session -p /startup/ssh-agent/enabled -n -t bool -s false

Instead its much easier to just hack on this via trusty ~/.bashrc

killall ssh-agent gpg-agent > /dev/null 2>&1
eval $(gpg-agent --daemon --enable-ssh-support)

GPG

On your daily machine we can now publish your primary pub.key as well as import the smartcard for daily use.

To generate the private key stubs and inform your daily GPG of the smartcard run

gpg2 --card-status

After which you should see your smartcard and offline master listed in

gpg2 --list-secret-keys

Other pain points

Smartcard fetch

There is an open issue here where running

gpg2 --card-edit
fetch

actually fails for me where GPG will search for the smartcards signing key ID while actually getting the master offline key ID. Thus the operation fails.

As a workaround you can totally pull the key with curl =\

https://www.cycloptivity.net/6E03FC34.txt | gpg2 --import

Missing Serial Numbers

In Donncha O’Cearbhaill’s very helpful post I found the key to swapping smartcards to avoid the “Please insert Serial Number X” error.

When changing cards first drop your private key

rm ~/.gnupg/private-keys-v1.d/<PRIVATE KEY ID>.key

Then, after a reboot import your smartcard details

gpg2 --card-status
ssh-add -l

References

These posts helped me out a lot when writing this! YMMV

https://help.riseup.net/en/security/message-security/openpgp/best-practices

http://blog.josefsson.org/2014/06/23/offline-gnupg-master-key-and-subkeys-on-yubikey-neo-smartcard/

https://github.com/herlo/ssh-gpg-smartcard-config/blob/master/YubiKey_NEO.rst

http://www.bradfordembedded.com/2013/12/yubikey-smartcard/

http://ekaia.org/blog/2009/05/10/creating-new-gpgkey/

https://www.debian-administration.org/users/dkg/weblog/97

https://developers.yubico.com/ykneo-openpgp/ResetApplet.html

https://josefsson.org/key-transition-2014-06-22.txt

http://www.bootc.net/archives/2013/06/09/my-perfect-gnupg-ssh-agent-setup/

http://dst.lbl.gov/ksblog/2011/05/xfce-without-gpg-agent/

http://docs.xfce.org/xfce/xfce4-session/advanced

http://donncha.is/2014/07/problems-using-an-openpgp-smartcard-for-ssh-with-gpg-agent/
Ahoy!

Its been a while and a lot has happened over the last few months. Of particular note is that the Cloudrouter.org team at IIX launched their public beta on the 31st of March!

Head over to https://cloudrouter.org/ to check out the latest on the project.

For those of you this side of the ditch, I have created a quick script to drag a copy of the repository to Brisbane. Your mirror link is http://repo.cycloptivity.net/cloudrouter.org/.

Personally, I plan in letting a few of these routers loose in DN42 over the coming months!

While using just a few nodes for DN42 has been I thought for fun I would deploy a few more POP’s around the world (The HE IPv6 video on sparse allocation might have helped!).

As such I introduce a number of new changes. I’ve extended my dn42.cycloptivity.net sub domain to include a country code for each node.

  • au01.dn42.cycloptivity.net - Aspley, Queensland

    My residential crappy ADSL2+ tail with routing via Ubiquiti EdgeRouter Lite. Currently blazes at 6/0.8Mbps. Eventually will move to a FTTH 100/40 service and host AU services for DN42. In the meantime au01.dn42.cycloptivity.net will no longer provide transit. Future nodes may include a Cisco 877 and Juniper SRX110 once bandwidth improves.

au02.dn42.cycloptivity.net - Brisbane, Queensland

aut-num:   AS4242420161
as-name:   CYCLOPTIVITY-AU02
remarks:   VYOS peering from Binary Lane Brisbane, AU.
remarks:   Peering via GRE+IPSec or OpenVPN
remarks:   Public Traceroute: au02.dn42.cycloptivity.net
ip4-net:   172.23.161.0/27

jp01.dn42.cycloptivity.net - Tokyo, Japan

aut-num:   AS4242420163
as-name:   CYCLOPTIVITY-JP01
remarks:   VYOS peering from VULTR Tokyo, JP.
remarks:   Peering via GRE+IPSec or OpenVPN
remarks:   Public Traceroute: jp01.dn42.cycloptivity.net
ip4-net:   172.23.161.32/27

us01.dn42.cycloptivity.net - San Jose, USA

aut-num:   AS4242420162
as-name:   CYCLOPTIVITY-US01
descr:     VYOS peering from VULTR Sillicon Valley, US. 
remarks:   Peering via GRE+IPSec or OpenVPN
remarks:   Public Traceroute: us01.dn42.cycloptivity.net
ip4-net:   172.23.161.64/27

de01.dn42.cycloptivity.net - Frankfurt, Germany

aut-num:   AS4242420164
as-name:   CYCLOPTIVITY-DE01
descr:     VYOS peering from VULTR Frankfurt, DE. 
remarks:   Peering via GRE+IPSec or OpenVPN
remarks:   Public Traceroute: de01.dn42.cycloptivity.net
ip4-net:   172.23.161.96/27

Currently the last remaining POP to go live will be jp01. All other nodes are already alive and able to provide transit (albeit sub-optimal in some cases). At this time all nodes are providing IPv4 only. Native IPv6 is planned next.

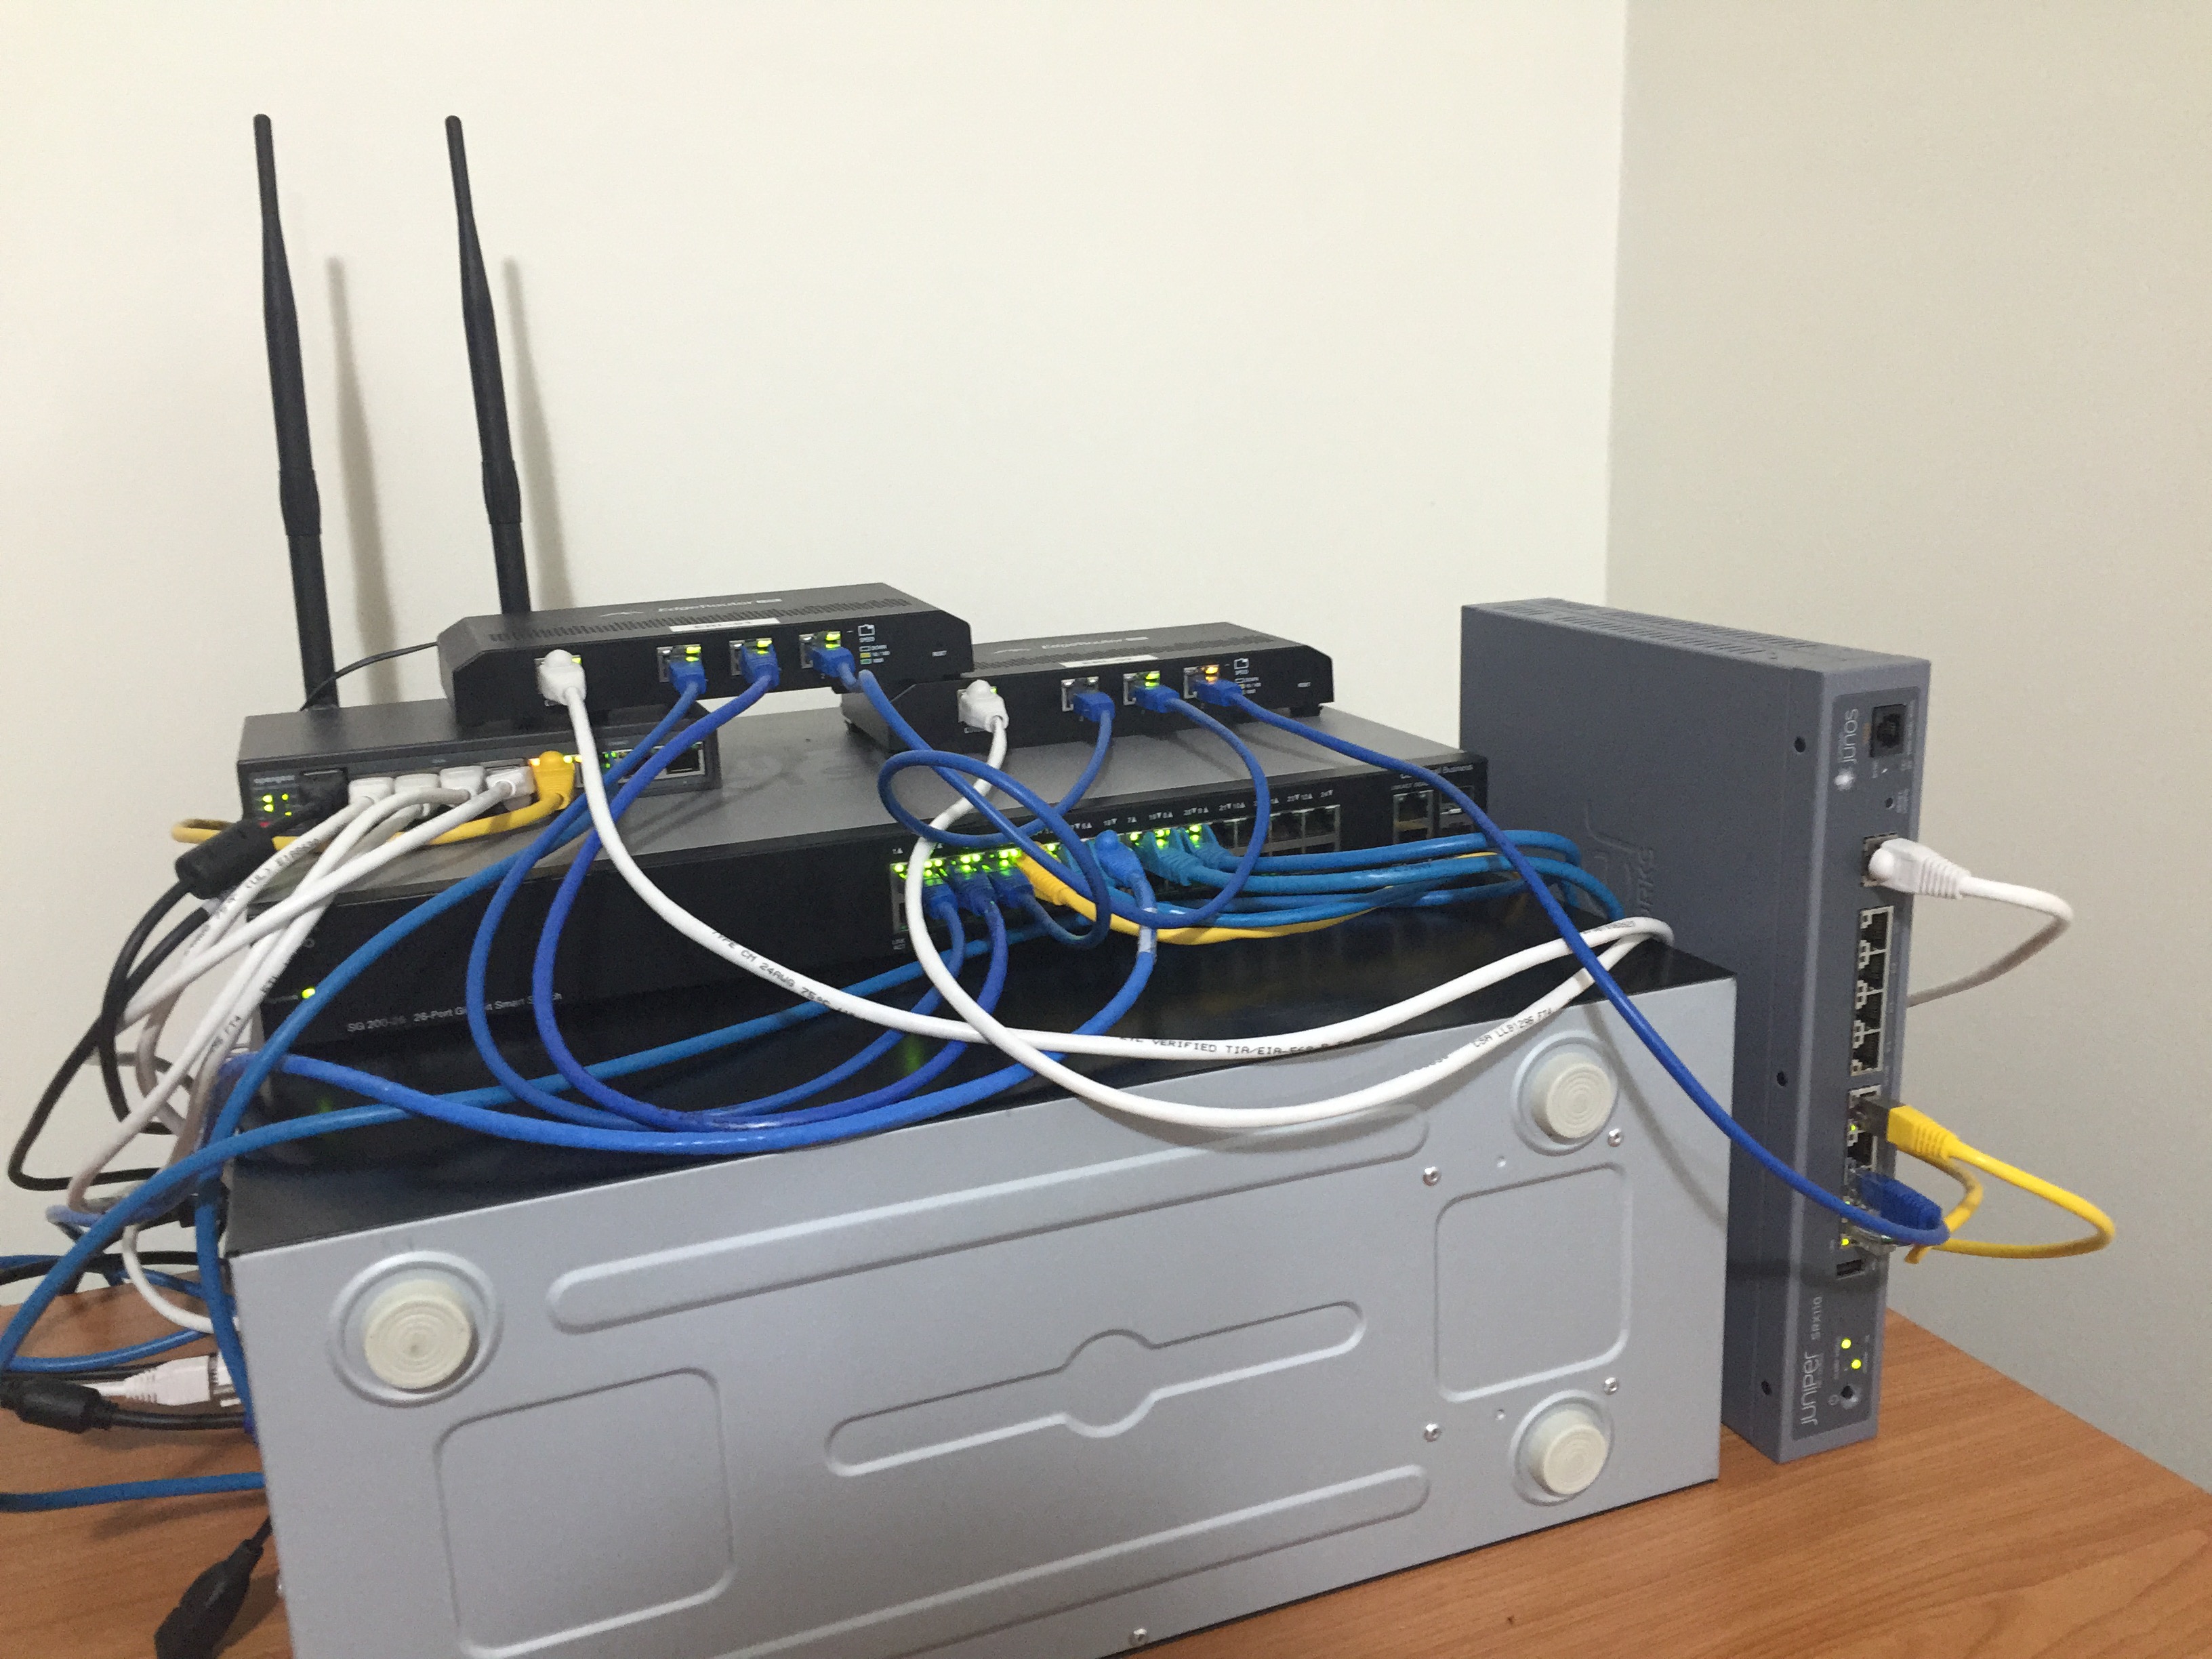
I’ve created a brief diagram showing average RTT between each node.

CYCLOPTIVITY-DN42

I am starting to make use of the phpipam tool to track address usage.

CYCLOPTIVITY-DN42 (172.23.161.0/25) has 4 directly nested subnets:

Subnet description	    Subnet	            Used	% Free	
au02.cycloptivity.dn42	172.23.161.0/27	    11/30   63.33		
jp01.cycloptivity.dn42	172.23.161.32/27	0/30	100		
us01.cycloptivity.dn42	172.23.161.64/27	2/30	93.33		
de01.cycloptivity.dn42	172.23.161.96/27	1/30	96.67	

Hopefully, I can make use of the phpipam API to create a automatic rdns tool. Tracking all the various interfaces is getting fairly tedious!

Thats all for now! If your interested in this sort of shenanigans please visit dn42.net!

Its not quite the next blog post that I promised but what the heck. Today we are talking about my recent experiences in peering VyOS into DN42 via OpenVPN.

This should help you to form site-to-site tunnels using OpenVPN!

Generating the keys

First we need to generate a PSK to exchange with our peer. Also note that on VyOS you need to store keys in /config/auth/ or suffer key loss during image updates.

vyos@ext02:~$ generate openvpn key /config/auth/peer.key

After sharing the pre-shared key with your peer we move onto config.

Tunnel configuration

Your peer will likely be running OpenVPN and actually using its config file syntax. Take this file for example.

mode p2p
rport 1194
lport 1194
remote 192.0.2.2
proto udp
dev-type tun
dev peer.example
encryption bf128
hash sha1
comp-lzo
secret /etc/openvpn/peer.key
user nobody
group nobody
persist-key
persist-tun
ifconfig 192.168.0.1 192.168.1.1
float
script-security 2
status /var/log/openvpn_status_peer.log
log-append /var/log/openvpn_peer.log
keepalive 10 60

Now we can convert to VyOS configuration statements.

set interfaces openvpn vtun1 encryption 'bf128'
set interfaces openvpn vtun1 hash 'sha1'
set interfaces openvpn vtun1 local-address '192.168.0.1'
set interfaces openvpn vtun1 local-host '192.0.2.1'
set interfaces openvpn vtun1 local-port '1194'
set interfaces openvpn vtun1 mode 'site-to-site'
set interfaces openvpn vtun1 openvpn-option 'comp-lzo'
set interfaces openvpn vtun1 remote-address '192.168.1.1'
set interfaces openvpn vtun1 remote-host '192.0.2.2'
set interfaces openvpn vtun1 remote-port '1194'
set interfaces openvpn vtun1 shared-secret-key-file '/config/auth/peer.key'

VyOS seems to expose most of the more arcane OpenVPN configuration statements via the set interfaces openvpn vtun1 openvpn-option command, so you should be able to match your peers configuration. By default VyOS will run the OpenVPN processes with a --ping 10 --ping-restart 60 so you can omit that.

Once configured you can run show openvpn site-to-site status to view your tunnels!

I have now provisioned a dedicated VPS with Binarylane in the NEXTDC B1 facility. From here we have a good place for DN42 transit until I am eventually connected to the NBN. Those that are interested, please feel free to traceroute dn42.cycloptivity.net.

Good luck and happy peering!